

[ad_1]
A DIY photo booth makes a great addition to practically any kind of social gathering. Not only does it serve as a way to keep guests entertained, but it also makes the celebration fun and extra memorable, especially when guests get to bring their photos home or find them online for social media sharing.
There are going to be plenty of holiday parties in the next few weeks, and at home photo booths are sure to be a big hit at any party. If you’re hosting a party this holiday season, why not create a DIY photo booth to jazz up the occasion? Or, if you’re a photographer looking to make some extra cash this season, forgo your regular event photography services and offer photo booth services instead. It’s easy and much less tiring, because you won’t have to walk around taking pictures of everyone at the party—they’ll be coming to you.
Ideal Equipment for a Holiday DIY Photo Booth
Image via Shutterstock
- Digital Camera
- Camera Tripod
- Remote Shutter Release
- Lighting
- Photo backdrop
- Holiday Photo Booth Props
- Optional Items (Printer, Monitor, Photo Booth Software)
Digital Camera
Compact digital cameras will work perfectly fine as photo booth equipment, but investing in a more professional DSLR or mirrorless camera with manual settings can be the more convenient choice if you plan on saving your images for large prints or if you will be using remote-controlled lighting and/or shutter.
Camera Tripod
Find a sturdy yet affordable tripod that can support your camera throughout the entire party and can be extended high enough for eye-level and overhead shots. This way, nobody has to hold the camera and shoot for every shot by hand, and you can enjoy the party even when you’re manning the booth yourself.
Remote Shutter Release
Adding a remote shutter to your camera setup opens up the possibility of allowing your guests to take timed photos on their own. At the same time, you can be included in photos instead of playing photographer the whole time, plus you won’t risk any internal camera shake or image blurring caused by pressing the shutter button.
Lighting
Some people do just fine without any external light sources, but your guests will thank you for the flattering lighting that a remote flash or spotlight can provide for your photo booth snaps. The usual option is an external flash that is supported by a light stand and can be triggered by your camera’s shutter. It’s also worth investing in a lighting umbrella for your flash to create a softer, more diffused light that will give your guests an attractive glow.
Or better yet, purchase a dimmable ring light that will allow you to mount your camera in the middle. A right light is one of the most flattering lighting options you can have when photographing people, which is why it is commonly used for beauty portraits.
Photo Backdrop
Using photo booth backdrops is a great way to improve your photos, as well as the overall experience. You can use printed tarpaulins, fabrics, and practically anything that you can design and personalize to create a fitting and festive background.
For holiday parties, you can create a snow-themed DIY backdrop using simple things you have lying around, like a blanket or rug, bits of styrofoam, and some glitter or metallic paper. You can add string lights, or even Santa and Rudolph cutouts.
For a more interactive DIY backdrop, you can assign somebody to drop bits of confetti or fake snow from above to add a nice effect for every photo.
If your budget will allow it, backdrop stands would also be of great help to ensure a quick and easy setup, and keep your backdrop in place. You can easily find them in physical and online stores or use the following suggested materials instead to manually setup your backdrop without stands:
- Your fabric of choice – Fabrics come in large sizes and at a more affordable price. Plus, they’re much easier to use as backdrops—just hang it and be done with it. Cut out a size of at least 5 ft. (width) x 4 ft. (height) to fit up to around 5 people in the frame, depending on your desired camera framing area.
- Mini spring clips and banner anchors – Purchase a couple of small spring clips and banner anchors that have an adhesive back so you can mount them along a horizontal line on the wall to hold your fabric, banners, and other decorations up.
- Ruler – You’ll want to use a ruler or tape measure to space your spring clips apart evenly and make sure that they are of the same height.
- Other decorations – Hang your banners, tassels, streamers, and other DIY decor using your spring clips, banner anchors, and some trusty tape.
Holiday Photo Booth Props
Props are crucial in making your guests’ photo booth experience fun and interesting. One of the first places you can look for props is your closet. Chances are, there are fun and fancy stuff there that you can use, like a feather boa or a cape from that costume party you once attended.
You can also ask permission to borrow from other people and look inside their closets for other interesting props. List down other props that you want to add and look for them in vintage shops and thrift stores to save a few bucks. Don’t forget to choose the ones that fit your holiday theme!
Optional Items (Printer, Monitor, Photo Booth Software)
The only real difference between DIY photo booths and professional ones is that the latter features a couple of things that allow a semi-automatic operation—from the timed photo capture to the speedy printing. They have a photo printer, a screen monitor facing your guests so they can carefully position themselves within the frame, and a photo booth software that provides the countdown and lays out images onto a digital frame with one or more photo windows right before printing.
These things obviously cost a lot, which is why some photographers on a budget don’t purchase any of them unless they have a couple of parties lined up or are thinking of putting up a small photo booth business. Nonetheless, if you already have the materials lying around (most photographers own photo printers, and at least one computer monitor) or if your budget will allow you to spring for such items, go ahead and add them to your photo booth!
Setting Up Your Photo Booth
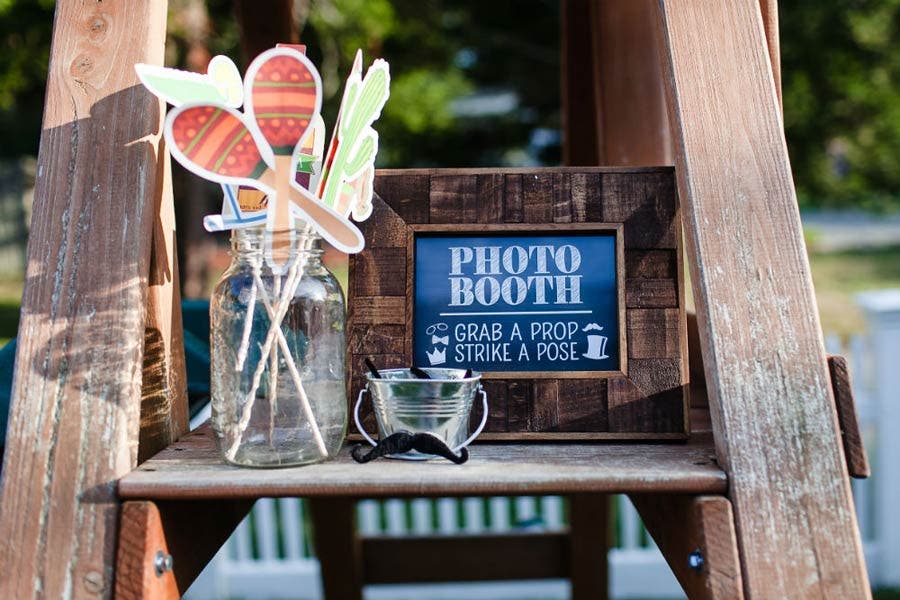 Image via Shutterstock
Choose the Best Spot
The size and accessibility of the photo booth site will dictate some factors in your overall setup. For instance, if the spot is too small to allow for lighting equipment such as umbrellas or softboxes, perhaps you’re better off using a small ring light. This is why you need to make sure to choose the best spot for your photo booth before going out and purchasing any items.
Make sure your chosen space is clutter-free. Ideally, the photo booth should be set up against a wall in a wide hallway or any spot where it wouldn’t be in the way of guests and the action. You can set it up near the entrance—sort of like a red carpet section—so that the guests won’t miss it.
The space should include the photo area for your guests and for all your other gear. The backdrop should be at least 5 feet across and 3-4 feet tall for waist up shots of up to 5 people, so consider the extra space that you’ll need for your operations—a chair, camera and tripod, light stand, laptop (if needed), and table or containers for your props.
Gather the Equipment
Create a checklist (using the essential equipment list provided above as your guide) of all the electronic equipment, backdrops, lighting, props, and other items you will need for the photo booth. Gather everything on that list before the party to make sure you’re not missing anything. If you aren’t hosting the party, make sure to double (or even triple) check all the necessary items you need before heading off to the venue.
If using a printer, ensure that it has more than enough ink for at least a hundred colored prints. Do test prints and make sure your images are of good color and that they fit your digital frame and photo paper perfectly.
Design the Photo Frame
Photo booth software usually has a few pre-designed templates for you to choose from, but you can also design your own using that same software, or perhaps with Adobe Photoshop, Adobe Illustrator, or any similar tool—just make sure to use the correct dimensions for printing.
There are a handful of photo booth apps and programs that you can purchase and download, should you choose to set up a more advanced and professional booth. These apps usually allow you to create and upload your own appropriately-sized photo border layout so you can spice up the look of your prints, aside from automatically creating a collage of 2-4 photos in each print.
Alternatively, you can order customized cardboard frames. Depending on the design and cut, you can stick your photo on it or slide your photo in. They may even have a foldable stand behind the card so that it can serve as a makeshift picture frame for your guests to display at home.
Prep the Photo Booth Area
Hours before the party, take measurements of your wall space and make sure the backdrop corresponds with that measurement. You can mark the surface with masking tape so that you will have a guide once you install your backdrop.
Make sure to move or remove any furniture or miscellaneous items that are in the area, and cover any windows with dark cloth so that light from the outside won’t interfere with your lighting during operations.
Assemble Your Gear
Attach your camera to the tripod and position it at your desired eye-level distance and angle. Connect it to your flash, remote shutter, printer, monitor, and/or computer. Do a couple of test shots with you or somebody else in front to make sure that the camera setup is working correctly, that the lighting exposure is good enough for solos and group shots, and that your backdrop covers the entire frame.
If you don’t have a monitor, use some tape to mark the floor area where your guests should stand during shoots. And finally, clean up your workspace, prepare your photo papers and frames (if any), display your props where they will be easily accessible to your guests (from the side or on the floor in front of them while standing in front of the camera), and hang up decorative signs to label your booth and provide instructions for your guests.
Bonus Tip: If you’re planning on making a business out of these photo booths, you can also distribute business cards or frames with your contact details and website where they can learn more about you or find soft copies of their photos. After all, digital copies are now in demand for social media sharing.
Fun Holiday Party Photo Booth Ideas
Want to have an awesome photo booth at your party this year? Do something different! Here are a few more photo booth ideas to make your booth—and photos—look more fun and creative for your guests.
Use Colorful Streamers
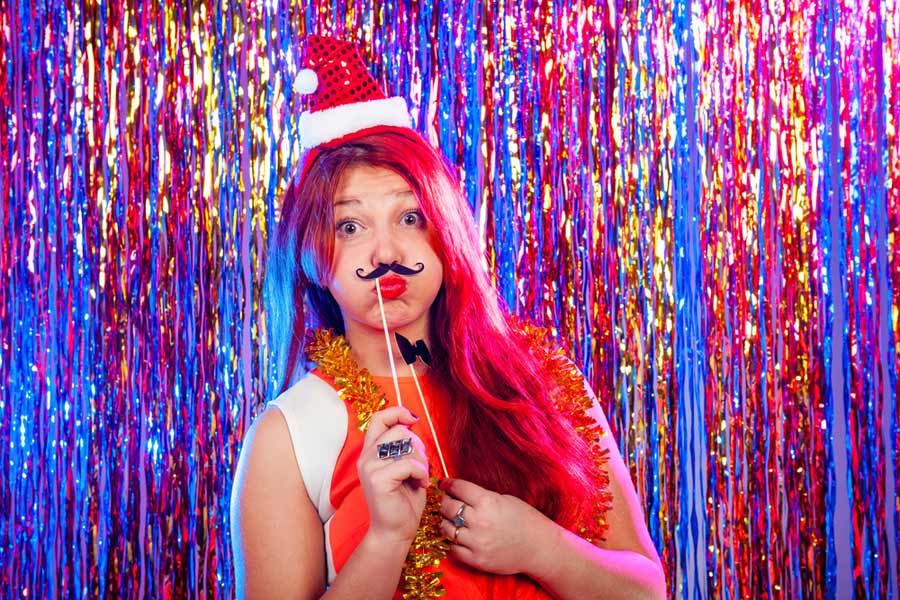 Image via Shutterstock
The holidays are all about colors and sparkles, and one cheap yet creative way to make your photo booth look instantly festive and perfect for a fun party is to use metallic streamers as your backdrop. Some stores have them all cut up and ready to hang, so all you have to do is pick one out, hang them on your banner anchors or tape them to the wall of your backdrop area, and you’re good to go! Test it out by looking into your camera viewfinder and make sure you’ve got the entire frame covered before allowing anybody to get in front of the camera.
Decorate with Lights
 Image via Shutterstock
Another easily available and versatile holiday party idea to make your photos look instantly jolly and merry is to add lights to your backdrop. Decorate it any way you want—you can let the strands of lights dangle from above or hang loosely from side to side using your spring clips or banner anchors. Just make sure you’re using safe and tested lights, especially if you’re placing the lights against paper and fabrics.
Go Wild With Confetti
 Image via Shutterstock
Confetti is also a fun way to add color and life to a photo. Plus, confetti means party! You can use colored ones, metallic ones, or even plain white confetti that can look like “snow” in your photos. Drop them from above or have guests “blow” them out towards the camera. It will be messy, but hey, they’ll surely have a blast and it will show in your pictures!
Light Up Some Sparklers
 Image via Shutterstock
Sparklers are widely available during end-of-year holidays. And obviously, they look awesome in pictures! Why not try adding them as optional props for your photo booth? Of course, these would probably be more fitting for outdoor photo booths where you have an open space for smoke. Make sure you also use a faster shutter speed to capture those sparkle details.
And of course, safety first!
Make Holiday-Themed Props
 Image via Shutterstock
To add to your collection of cool props, make sure you add holiday-themed items. Some staples are wearable Santa hats and beards, reindeer headbands, elf ears, mistletoe, and other green and red-colored accessories. You can also add a few New Year-themed props, including glittery hats, “2018” glasses, cone party hats, and horns.
If you can’t find wearable ones, you can always create cut outs and secure them on sticks. Don’t forget to create unique and fun speech balloon cardboards and maybe a few small whiteboards or chalkboards that your guests can use and write on.
Should You Build a DIY Photo Booth?
Building a DIY photo booth is a great way to make use of the photo gear you already have. If you can use your existing camera, flash, printer, and other accessories, you can save some money with an at-home photo booth.
Frequency of Use
How often will you use your photo booth? If you’ll just use it once or twice a year, then it’s probably worth it to create a photo booth out of the photo gear you already own. While many of your gear components won’t necessarily be perfectly suited to a photo booth, they’ll work well enough for basic and infrequent use.
If you can see yourself wanting to use the photo booth more regularly or for professional purposes, a photo booth kit will be more streamlined and easier to set up and use.
Gear Proficiency
If you know how to use your gear really well and have already practiced shooting while tethered to a laptop or tablet, then you’ll have an easier time setting up a DIY photo booth. If any of the concepts we’ve discussed so far overwhelm you, then a ready photo booth kit is probably the better option for you.
Buy a Ready Photo Booth Kit
Deciding to purchase an existing photo booth kit will save you time and the effort of troubleshooting a DIY set up. Photo booth equipment found in kits also has a level of polish and function that’s difficult to duplicate in a DIY version.
If you’re interested in a ready photo booth kit, the first step is to decide how involved you want your photo booth to be. Do you want a model that will print photos to hand out on the spot or would you rather keep it digital and select a model that will email the final photos to your subjects?
Many photo booth kits feature proprietary software that makes the whole process much easier to manage, so you can essentially plug and play.
Photo booths are extremely popular for parties and events, so there are plenty of ready-to-go photo booth options to choose from in a range of prices and capabilities.
Don’t want to DIY the whole thing? Tether Tools Studio makes two different photo booth kits you can assemble at home or in your party venue: the Tether Tools Studio Vu-2 Photo Booth or the Tether Tools Rock Solid PhotoBooth Kit.
So there you have it—a step-by-step guide on how to set up your own holiday photo booth at your next holiday party. Aside from being practical, choosing to have a photo booth instead of renting one allows you to add personal touches to your setup and make the experience extra special for your guests!

Adorama
Adorama’s 42West is the content destination for photographers, filmmakers, audio creatives and all things electronic. Check out our up-to-date editorial features on all the latest gear, how-to’s and interviews with today’s most relevant industry insiders.
[ad_2]
Leave a Reply